
Interactors - Part 1
Introduction
How many times have you designed a view, containing UITextFields, and ended up writing copious amounts of boilerplate code to validate keystrokes because you wanted to edit an integer, or more especially, a decimal value?
In which case, you should be pleased to know there is a simpler way.
The concept of an Interactor comes from the classic Model View Presenter design pattern. The Presenter holds a list of Interactors and each one mediates between a View (or a Control) and can notify the View of changes to the Model and can respond to Gestures on a Control by translating those gestures into Commands on the Model, changes to the Selection on the Model, enabling or disabling Menus according to the Selection, etc.
By way of a simple(ish) introduction to Interactors, we are going to build on the previous articles, which talked about Events and the NotifyPropertyChanged protocol, by building a hierarchy of Interactors that will allow us to simply place UITextFields and UILabels on a view, hook them up to Interactor objects in IB and instantly have all the keystroke validation we need to ensure that integer or decimal properties on an object receive valid values; what is more, the property value will be updated at every keystroke, with a view to adding object and property validation rules later on.
The Basics
Let’s start by defining the essentials of an Interactor as a protocol:
public protocol InteractorProtocol
{
  var isActive: Bool { get }

  func activate()

  func deactivate()

  func addNestedInteractor(_ interactor: InteractorProtocol)

  func removeNestedInteractor(_ interactor: InteractorProtocol)
}
An Interactor can be in either an active or inactive state; in other words, we need to be able to stop notifications happening from the Model to the View when we are updating the Model value from the View. Otherwise, we end up with a change in the View being propogated as a change to the Model, which propogates a notification to the View, which… You can guess where this ends up - infinite recursion!
There are instances when we might want to handle interactions on subviews within an Interactor that is managing the containing view. For example we might have a view representing a list of editable items, where we would want to be able to react to changes in the list (add/remove/move) as well as changes to any item in the list. Any nested interactors are activated or deactivated as and when the parent Interactor is activated or deactivated.
And that is all there is to the basic idea of an Interactor. Of course, we need to add a means of attaching it to a subject object and a view or control, but that will come later.
The next step is to create a base class to implement this fundamental behaviour.
A Basic Interactor
There are all sorts of ways that we can create Interactors and various purposes to which we can put them. In this example, we are going to create a class, whose instances can be placed on a UIViewController in a storyboard and that can be hooked up in IB. So we need to start by deriving our class from NSObject.
public class Interactor: NSObject
{
  public private(set) var isActive: Bool = false

  private lazy var nestedInteractors: [Interactor] =
  {
    return [Interactor]()
  }()

  public func activate()
  {
    nestedInteractors.forEach { $0.activate() }

    isActive = true
  }

  public func deactivate()
  {
    isActive = false

    nestedInteractors.forEach { $0.deactivate() }
  }

  public func addNestedInteractor(_ interactor: Interactor)
  {
    nestedInteractors.append(interactor)

    if isActive
    {
      interactor.activate()
    }
  }

  public func removeNestedInteractor(_ interactor: Interactor)
  {
    if interactor.isActive
    {
      interactor.deactivate()
    }

    if let index = nestedInteractors.index(of: interactor)
    {
      nestedInteractors.remove(at: index)
    }
  }
}
It’s not rocket science and we haven’t actually implemented the protocol but, since this is a base class of a hierarchy, the protocol really isn’t necessary here, apart from using it as a template definition of what the class should look like.
Responding to the NotifyPropertyChanged Protocol
If we are going to be able to update a view or control when a property value changes, we are also going to have to “mix-in” a protocol that defines how we are going to listen to and respond to those changes.
public protocol PropertyInteractorProtocol
{
  associatedtype SubjectType

  var subject: SubjectType? { get set }

  var propertyName: String? { get }

  var propertyChangeClosure: PropertyChangeClosure { get }
}
This protocol declares that the Interactor needs to hold a reference to a subject and needs to know what type that subject is, along with the name of the property to which we want to respond.
It also requires that we include a closure to respond to the NotifyPropertyChanged event.
Since, in this example, we want to be able to create instances of Interactors in a storyboard, our implementing class has to comply, not only to our own protocols, but also, to the requirements of IB’s designers:
@IBDesignable public class NSObjectPropertyInteractor : Interactor, PropertyInteractorProtocol
{
  @IBOutlet public var subject: NSObject?
  {
    didSet
    {
      didSet(subject: subject)
    }
  }

  @IBInspectable public var propertyName: String?

  func didSet(subject: NSObject?)
  {
    if let subject = subject as? NotifyPropertyChanged
    {
      subject.propertyChanged += propertyChangeClosure
    }

    activate()
  }

  func propertyDidChange(sender: Any, args: PropertyChangedEventArgs) { }

  public lazy var propertyChangeClosure: PropertyChangeClosure =
  {
    return PropertyChangeClosure
    {
      [unowned self] sender, args in

      if args.propertyName == self.propertyName
      {
        self.propertyDidChange(sender: sender, args: args)
      }
    }
  }()
}
NSObjectPropertyInteractor is marked as @IBDesignable because we want to be able to set the propertyName in IB, it derives from the base Interactor class and then mixes in the PropertyInteractorProtocol behaviour.
The subject var is implemented as an @IBOutlet, in case we should want to create an object for the subject in the storyboard but this is not strictly necessary if you intend always to set the subject in code. Its type is specified as NSObject because we intend to use KVC’s value(forKey:) and setValue(_: forKey:) methods to get and update the subject’s property values.
The didSet block of the subject var calls a didSet(subject:) method which, at this level of the hierarchy, hooks up the subject’s NotifyPropertyChanged event to the interactor’s propertyChangeClosure. Separating out this method from the closure will allow us to override it to add further behaviour in subclasses.
The propertyName var is also marked as @IBInspectable to allow us to set it in the storyboard.
We implement the propertyChangeClosure property as a lazy var whose closure responds to the event by calling the propertyDidChange(sender:args:) method if the propertyName in the args parameter matches that in the interactor. This method is empty at this level of the hierarchy, but will be overridden to react in a way appropriate to the type of model/view relationship a derived class is intended to handle.
Connecting to a View
Before we move on to reacting to and validating user gestures in controls, let’s create a simple interactor that will automatically update a UILabel when a property value changes. Of course, the principles do not just apply to UILabels; we could equally use similar code for any UIView subclass.
public protocol ViewInteractorProtocol
{
  associatedtype ViewType

  var view: ViewType! { get }

  func configureView()

  func updateView()
}
We need to hold on to a reference to the view; from the protocol’s point of view, this property can be readonly; although we will implement it as readwrite in the implementing class in order to be able to connect it to a view in IB.
Then we declare a requirement for a configureView() method to set up the view’s initial state and an updateView() method to react when the interactor is notified of a change.
extension ViewInteractorProtocol
{
  public func configureView() { }
}
We can add a default, empty, configureView() method in an extension to this protocol to save us having to add an empty one in any derived class that doesn’t need to do any initial configuration.
However, the updateView() method is mandatory and its contents depend on where it is implemented, so we do not provide a default implementation in the protocol extension.
A Label Interactor
@IBDesignable public class LabelInteractor : NSObjectPropertyInteractor, ViewInteractorProtocol
{
  @IBOutlet public var view: UILabel!

  override func didSet(subject: NSObject?)
  {
    super.didSet(subject: subject)

    updateView()
  }

  public func updateView()
  {
    guard let subject = subject,
          let key = propertyName else
    {
      return
    }

    view.text = subject.value(forKey: key).description
  }

  override func propertyDidChange(sender: Any, args: PropertyChangedEventArgs)
  {
    DispatchQueue.main.async
    {
      [unowned self] in

      if self.isActive
      {
        self.updateView()
      }
    }
  }
}
Once again, we create the class to be @IBDesignable and make the view var an @IBOutlet to facilitate using it in IB. The view’s type is set to UILabel.
We override the didSet(subject:) method from NSObjectPropertyInteractor to add a call to the updateView() method, which is implemented here to use a general mechanism for setting the text on the label to a string describing the value. There is no formatting at this point as this class is only really intended as a base class that would be expected to deal with string values by default.
Since the NotifyPropertyChanged event dispatches the property change notification on a background thread, we need to update the UI on the main thread in the propertyDidChange method, but only if the interactor is active; otherwise we could end up with an infinite recursion.
Putting It All Together
The Test Class
public class Person : NSObject, NotifyPropertyChanged
{
  public var name: String = ""
  {
    didSet
    {
      onPropertyChanged("name")
    }
  }

  public lazy var propertyChanged: PropertyChangedEvent =
  {
    return PropertyChangedEvent(sender: self)
  }()
}
The ViewController
class TestViewController : UIViewController
{
  @IBOutlet public var labelInteractors: [LabelInteractor]!

  var person = Person()

  override func viewDidLoad()
  {
    super.viewDidLoad()

    labelInteractors.forEach { $0.subject = person }
  }

  @IBAction func rename()
  {
    person.name = "Swift"
  }
}
I have added an @IBOutlet collection so that we can talk to any label interactors on the view and set their subject property in the viewDidLoad() method
The button’s @IBAction simply sets the name property on the Person. But that is all the code you need in the view controller.
You might think that it is hardly worth the effort to create an interactor for this scenario but, when we move on to integer and decimal properties, the saving in boilerplate code becomes significant.
The Storyboard
In IB, create a view controller and set its class to TestViewController; then place an NSObject on it and set its class to LabelInteractor.
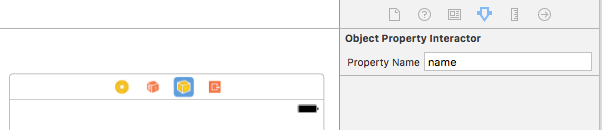
In the attributes inspector, set the name of the property
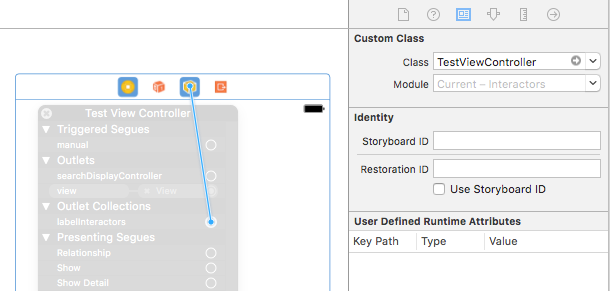
From the view controller, drag to add the interactor to the labelInteractors outlet

Then drag from the interactor to the label to connect the view outlet.
Connect the button to its IBAction in the view controller and that’s about all you should need to do.
Summary
So there you have a simple example of how an Interactor can be used to remove boilerplate code from a view controller. So far we haven’t really saved that much effort but, when it comes to handling numeric properties, along with their formatting, the advantages soon mount up.
And when you need something like credit card entry or hexadecimal numbers, it starts to make even more sense.
I’m keeping these articles short(ish) because there’s quite a lot to take in overall. The next article will carry on from here and discuss connecting labels to numeric value properties, along with their formatting.